Performance Penthouse (901) User Guide
Jeremy Estes, July 2016 08 Sep 2016Contents
- Introduction
- Setting up the Mobile Rig
- Patching and Troubleshooting, Hanging House Mics
- East Wall AVP and Crestron Control
- Lighting, Curtains, and Shades
1. Introduction
This guide is for beginner employees looking to touch up or relearn how to patch the mobile rig into the 901 AV system, as well as any employees who are looking to troubleshoot patching or other AV issues in this space. For any details on the mobile rig itself, please refer to the Mobile Rig User Guide. This guide will only explain how to use and troubleshoot the technical systems of the Penthouse.
2. Setting up the Mobile Rig
The Penthouse has a built in AV system, which means you do not need to bring any extra speakers with you unless you are working a live musical concert. Mic’d musicians usually request monitors, and digital musicians may request a subwoofer and or quadraphonic mains. If you are looking for details about how to set up monitors, please refer to the Mobile Rig User Guide. The mobile rig is almost always placed in the northwest corner of the space, near the lighting console. After you open and place the mobile rig, find the wall audio-video plate (AVP) on the North wall. This is the plate you will use both for power and audio.
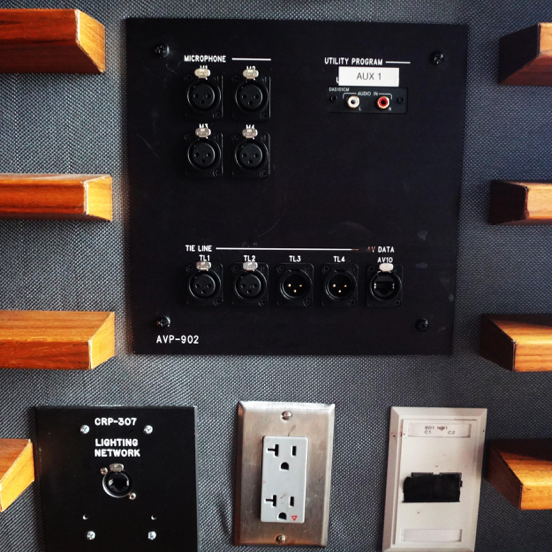 Figure 1: Image of the North wall AVP
First, plug in your power to this AVP. Then take the two 50’ XLRs in the back of the rig and cable them from the main left and right XLR outs on the rig to Tie Lines 1 and 2 (TL1 and TL2). In an ideal world, this should be all you have to do in order to get hooked up correctly to the main speakers in 901, and often times it is. However it is not uncommon for problems to arise at this point. Since the patchbay/amp room for the Penthouse system is not a secure room, it is necessary that we understand how to troubleshoot the equipment in case someone decides to go in and switch things around from their typical places.
3. Patching and Troubleshooting, Hanging House Mics
The patchbay/amp room for the Penthouse is located on the east side of the south wall, behind a door designed to remain camouflaged into the wall. You can find it by looking for the crease that runs up the wall in that area. Open the door by pulling on any of the wood planks sticking out of the wall just to the right of the crease. After passing through this door you will find yourself in a small vestibule area. On your right should be the patchbay and amps. Directly in front of you should be a secured metal door that leads into instrument storage for the Penthouse. If you are ever requested to get the piano out, you will find it in that room.
When working in the patchbay/amp room, it is recommended that you prop either or both of the doors into the vestibule, since there are no installed lights in this area. The amp rack may be a little overwhelming at first, however there are really only two main sections that you need to focus on when troubleshooting audio problems. One area is the patchbay (Figure 2) and the other is the EV DC-ONE DSP below it. The other components in the rack consist of amplifiers and additional DSPs for the mains, a hearing assist transmitter (for the assistive listening devices), a Blu-ray Player, a turntable, and a Tascam CD player/SD Recorder, among a few other Crestron related pieces of hardware.
The patchbay is the sort of heart of your signal flow. Whenever you plug anything into any of the wall AVPs, this is where that signal shows up for you to then send to some other location. The patch bay consists of the components pictured in Figure 2.
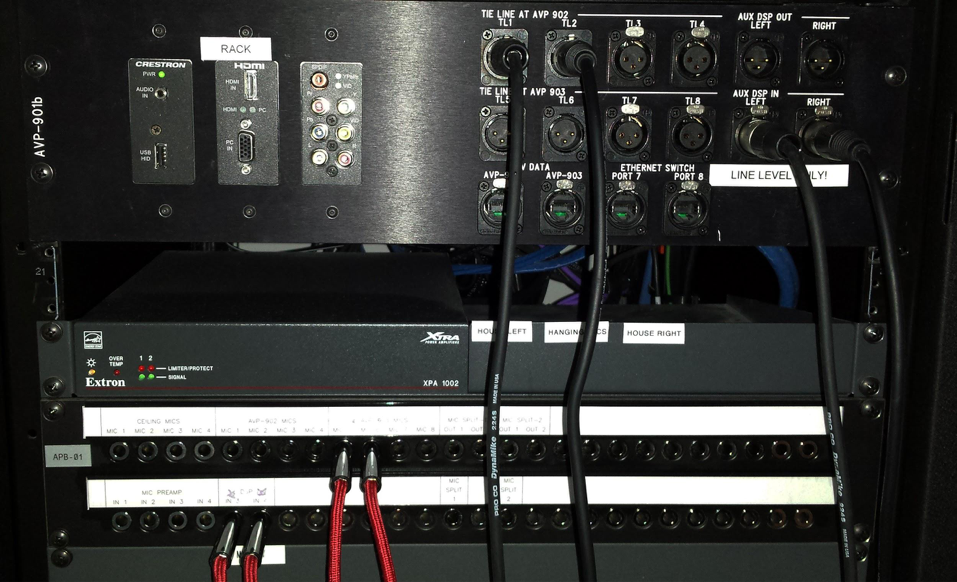 Figure 2: Image of the 901 Patchbay
If everything is patched correctly, TL1 and TL2 should be patched to AUX DSP IN LEFT and RIGHT as in Figure 3. These latter two inputs go to the built in main speakers. If for some reason you are placed near a different AVP and need to plug into a different pair of tie line inputs, then simply find those tie lines in the patchbay and patch them into the AUX DSP INs as in Figure 3.
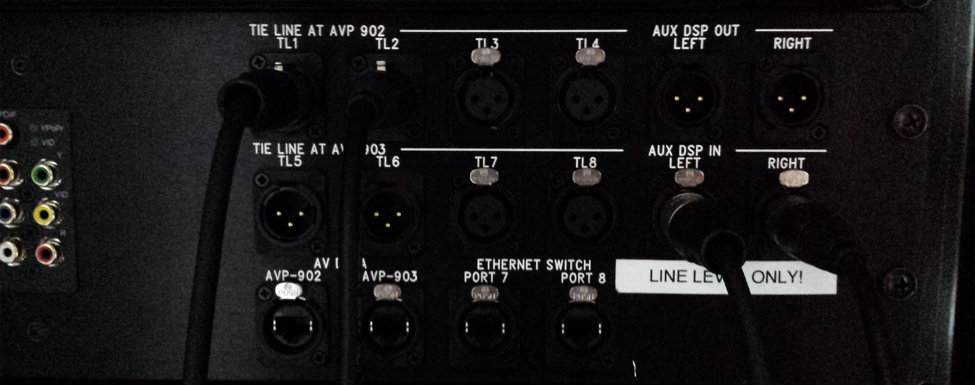 Figure 3: Image of the XLR section of the patchbay with line level inputs.
Note the label in the image ’LINE LEVEL ONLY.’ There are three main ways signal can flow through an audio system, and these are at mic level, line level, and speaker level. The different levels refer to the amount of electrical power transferred by each type of signal. Mic level signal is the signal that is generated by a microphone. It consists of very small voltages and in order to be able to be processed and sent to other places it needs to be boosted up to line level, which is the type of signal that comes from stereo playback like that from CDs or ipods. Speaker level is above this and the signal only reaches this point once it passes through an amplifier on its way to a loudspeaker. Speaker level signals can transfer a very large amount of electrical power and can therefore be dangerous to work with. You need a very large signal to drive the large woofers that are found in modern loudspeakers, thus the audio signal is boosted to speaker level from line level using an amplifier in order to be able to have enough power to drive loudspeaker components. If you are plugging a microphone directly into a wall plate, without going through a mixer like the mobile rig (which boosts the signal up to line level via preamps), then you need to plug your mic into one of the MIC inputs on any of the wall plates instead of a tie line, which only takes line level signal. You then need to go into the patchbay, find the quarter inch output corresponding to whichever input you plugged into on the wall, and patch that output into one of the two DSP inputs on the row below, as in Figure 4, labeled ’Mic Level’.
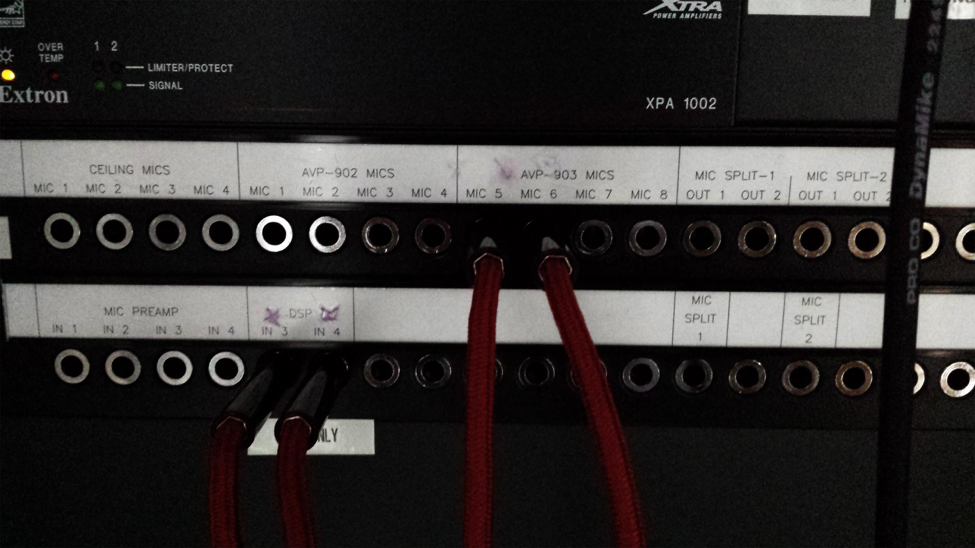 Figure 4: TRS section of the patchbay with Mic level inputs
In this figure you may notice that Mics 5 and 6 are patched to the Mic Level DSP ins using quarter inch cable. Most people tend to plug microphones into the AVP on the East wall since it is the closest AVP to the stage area (the East wall or teaching wall) which contains mic inputs 5 and 6. Leaving this patching in place simplifies the lives of those people not acquainted with audio equipment and patching.
If you are getting signal out of your mixer (meaning you are seeing signal on your master channels) but are not getting anything out of the mains, the first thing you should do is check to make sure that the tie lines you are plugged into are correctly patched into the AUX DSP LEFT and RIGHT inputs in the patch bay. Once this is done, if you are still not getting signal, move down to the EV DSP just below the patch bay area of the amp rack. Any signal being sent to the mains get processed through this DSP just before it gets sent out to the speakers. It has a crossover, high-pass and low-pass filters, parametric and graphic EQs, and leveling parameters, among other things. You should never have to mess with any of those settings. All you need to worry about is the far right section of the DSP, which lists your six possible outputs from the DSP. The Penthouse only uses four of the six, putting the mains in a bi-amplified configuration.
Outputs 1 and 4 are your low frequency outs, sending the low end of the signal to the woofers of each respective speaker. Outputs 2 and 5 are your high frequency outs, sending the high end of the signal to the tweeters of each respective speaker. These settings are indicated by little green lights on the DSP, with a green light next to ’LO’ lit up on outputs 1 and 4, and one for ’HI’ on outputs 2 and 5, as in Figure 5.
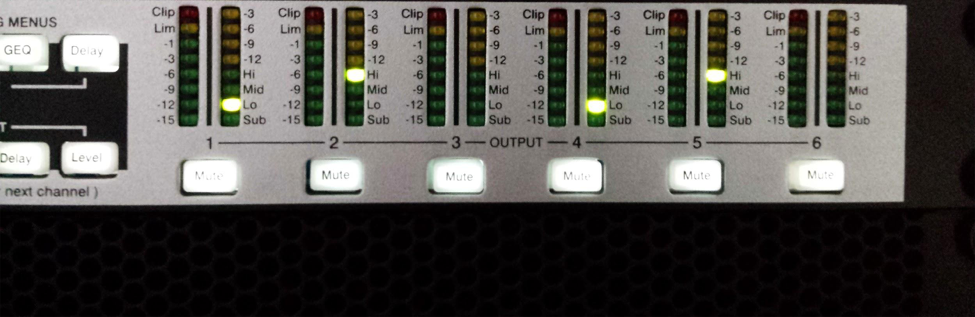 Figure 5: Image of the Output side of the EV DC-ONE DSP
Notice that each of these outputs has a mute button. If these mute buttons are pushed down, they will be bright red and will prevent signal from coming out of whichever outs are muted. This is the last step of the troubleshooting process. Sometimes you may come into the amp room looking for signs as to why you aren’t getting signal out of your mains. If these little red mutes are lit up then that is probably why. Simply push them to unmute them. If you are still experiencing issues contact a supervisor or an experienced A1, as any further troubleshooting is more advanced and requires more time and resources to complete.
Hanging House Mic Feed:
You should notice that there are two small microphones hanging down in the center of the room from the ceiling in 901. These microphones are permanently installed and were spec’d for the purpose of ambient room recordings for acoustic events or events in which microphones are unnecessary or unused. These microphones are run directly into the patch bay and come out of ‘CEILING MICS’ 3 and 4 in the mic level area of the patchbay (Figure 4). In order to get the signal coming from these microphones for recording purposes you must first patch these mic outputs to whichever tie lines you would like the signal to be sent to in the house. For example, if I have the mobile rig set up and patched into the North Wall AVP and I wanted to send the hanging house mic feed to my board, I would find two quarter inch to male XLR cables from the rack of cables on the wall to the right of the patchbay, plug the quarter inch ends into ‘CEILING MICS’ outs 3 and 4, and plug the XLR ends into TL 3 and TL4 respectively in the line level area of the patchbay (Figure 3). Tie lines 3 and 4 are the two output tie lines on the North Wall AVP (Figure 1). This way I am effectively sending the signal from the hanging house mics to tie lines 3 and 4. I can now take some XLR and patch tie lines 3 and 4 into whatever inputs on the MixWizard I would like. The last thing to remember is that the hanging house mics are condenser microphones, which means that you need to send phantom power +48 volts to them in order to get any signal whatsoever out of them. After you hit the +48 volts button on whichever input channels you plugged into, hit the pre-fade listen button (PFL) and WITHOUT bringing up your channel fader, slowly gain up your two hanging house mic channels until you start to see a sizable signal. In order to test whether or not you are getting good signal you can clap in the space and see if you get a bump in your metering. Alternatively you can plug headphones into the Headphones output on the MixWizard, hit the pre-fade listen button on your hanging house mic channels which sends any incoming signal on that channel to your headphones, and turn up your headphones volume control in order to listen to the signal you are getting from your mics. Make sure to NEVER turn up your channel faders on your hanging house mic channels, as this will almost certainly cause hazardous feedback.
4. East Wall AVP and Crestron Control
A typical lecture in the Penthouse includes a speaker with a powerpoint from a lectern. From section one you know how to set up your mobile rig, however now you need to set up the video system for the powerpoint. The East wall AVP (Figure 6) contains the usual Audio inputs and outputs similar to the North wall AVP, in addition to a video input wall plate. Above this you will also find a Crestron AV source controller (Figure 7), and another plate of buttons used to control the level of the roller shades on all of the windows in the space (Figure 9).
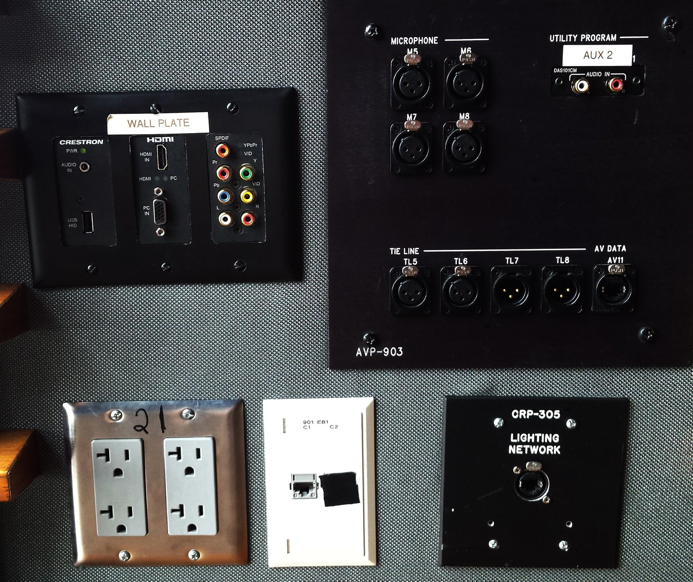 Figure 6: Image of the East Wall AVP
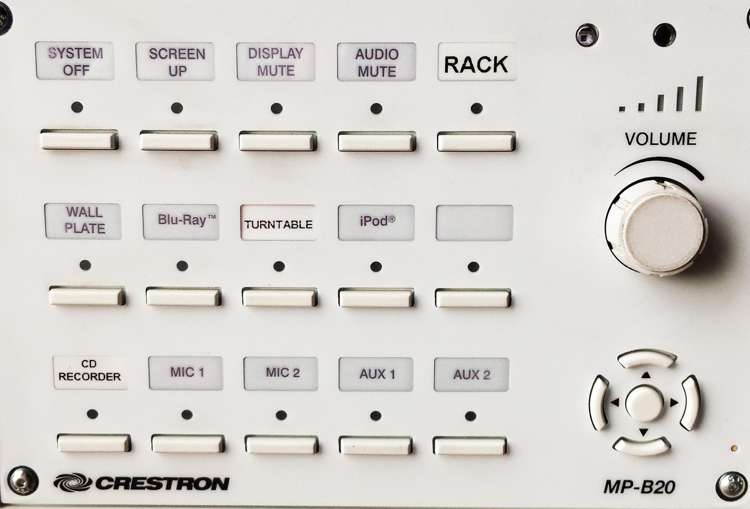 Figure 7: Image of the Crestron Source Controller
As the name suggests this Crestron Controller selects and controls the volume of a particular AV input in the Penthouse. The ’SYSTEM OFF’ button will turn off the projector. The row of buttons on the bottom, as well as the ’iPod’ button select your potential audio inputs, if you are working in the space without a mixer. ’MIC 1’ and ’MIC 2’ refer to mic inputs 5 and 6 on the east wall AVP just below this controller. If you plug a microphone directly into one of this inputs, you can control its volume by hitting either the ’MIC 1’ or ’MIC 2’ buttons depending on which input you plugged into, and then using the jog wheel on the right of the Crestron Controller to turn up the volume. Note that this jog wheel is extremely insensitive, and you must turn it many times before you start to get any noticeable volume increase. The ’CD RECORDER’ button sets the audio source to the Tascam CD Player that can be found in the amp room and the other buttons in the second row are your video sources which I will speak to next.
In order to project anything in this space, you first need to fly in the screen and turn on the projector. To do this, you can hit either the ’iPod,’ ’Blu-Ray,’ ’WALL PLATE,’ or ’RACK’ buttons on the Crestron source controller in Figure 5. Hitting any of these buttons will cause the projection screen to fly in and the projector itself to turn on. In most cases you will hit the ’WALL PLATE’ button, since this sets the video source to the wall plate in Figure 4. This video wall plate has four different types of video inputs, the most common of which are DVI and HDMI. Once the screen is flown in and the projector is turned on you should be able to simply plug in the laptop or source of video to the wall plate and Crestron should take care of the rest, recognizing the input and projecting it as you would like. Unfortunately this does not always happen. If you plug in your video source to the wall plate and do not get anything on the screen, first make sure that the ’WALL PLATE’ button is selected on the Crestron Controller. Note that hitting this button sets the volume source for the jog wheel to whatever is being plugged into the wall plate input. In our case this would be your laptop input. Therefore if you are getting projection but your audio is not coming through then make sure the jog wheel is sufficiently turned up enough.
Next, go to the amp room and find the pullout drawer at the bottom of the amp rack. Inside you should find a small grey remote which controls the projector. Take this out, make sure the ON/OFF button is set to ON on the bottom left of the remote and hit the input source button in the middle of the remote to make the projector scan through all possible input sources. If this does not help, the next and usually most auspicious troubleshooting technique is trying a new cable. You can also check the computer being used as the video source. When you plug the computer into the wall plate the computer should recognize the projector as if you simply plugged a new monitor into the computer. If it does not pick up the projector, then your problem could be sourced within the computer, in which case you should also find a backup computer (the macbooks from the cage are our go-to for this purpose). The vast majority of the time trying a new cable and or computer will solve your problem.
If you do not have any problems and your laptop plugs in and projects properly, then you should not have to do much else; however, keep the projector remote in hand, as the ’SHUTTER’ button comes in handy quite often as a quick and mobile way to mute the projector. You should also always go into the laptop’s system preferences and check to make sure any video settings (such as mirroring, screen resolution, etc…) are set as you would like them to be, as well as turning off sleep settings and notifications so as to avoid potential hiccups during a show. Other than this, you should be set up and ready to go.
5. Lighting, Curtains, and Shades
Events in the Penthouse usually request some very simple lighting needs. For this purpose we have a number of pre-focused lights on various parts of the stage area and a Strand Lighting Basic Palette II console for live control of these lights.
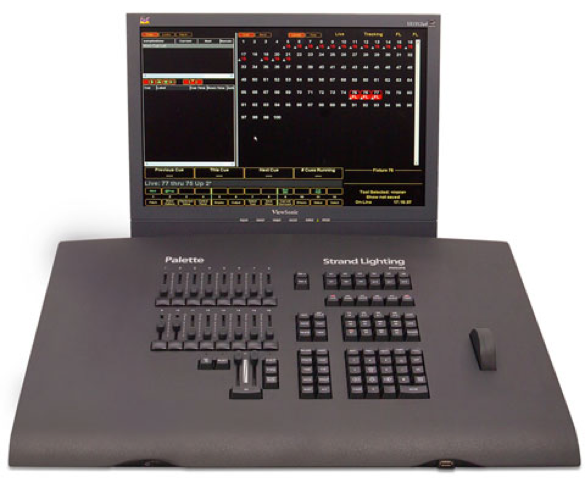 Figure 8: Image of the Strand Lighting Basic Palette II Console
The Strand console has control over all of the lights in the Penthouse, including the house and vestibule lights, however in order to control them from the board you first must turn off the presets by choosing the ”OFF” button in either of the wall plates near the main entrance or on the east wall. Before turning the presets off, you’ll want to turn on the board by hitting the small switch on the front, and turning up your house and vestibule faders. Give the board and monitor a few minutes to warm up. You then should have control over the lights in the space using the faders on the left side of the board. Typically you don’t need to write cues in this space, and using the faders as live control is enough. As you will see, the faders have been labeled according to whichever lights they control. To confirm which lights are which, simply turn the faders up and down to observe where the lights are focused. There are lights focused on the most common areas for lecterns, as well as the stage and house areas. Make sure to check all of the faders to make sure they are working correctly and that they control the lights they claim to. If you find that a light seems to have been moved or is out of focus, alert your supervisor. If someone asks if you can provide a spot in an area which does not currently have one, it is okay to say no and explain that the lights in the space are pre-focused and unintelligent, and setting up a new light can only be done during hours set aside for tech.
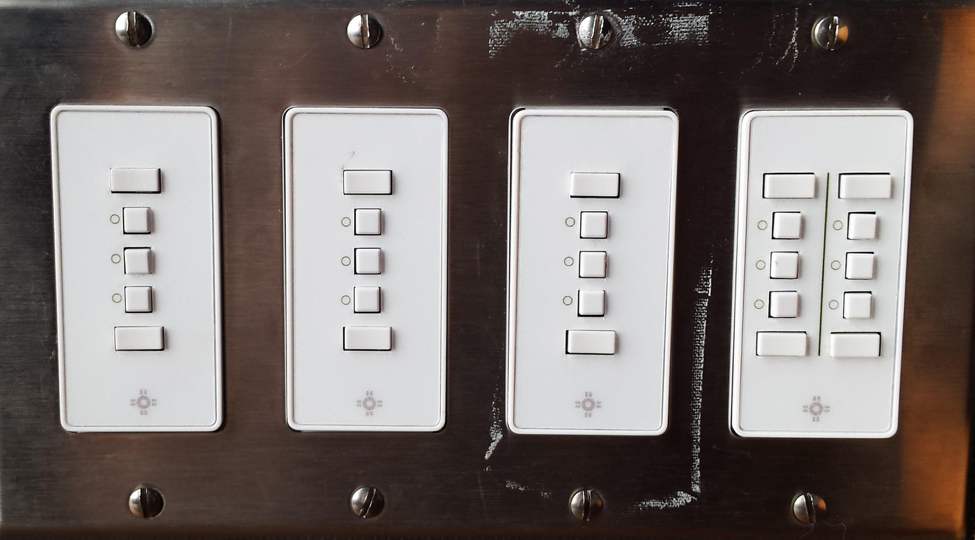 Figure 9: Image of the shade control panel on the East wall just above the AVP
Figure 9 displays the shade control panel that can be found just above the AVP on the east wall. All of the windows in the Penthouse are equipped with a electric roller shade which can be flown in to varying heights depending on which buttons you press on this panel. The top and bottom buttons in each set fly the shades all the way out or all the way in, respectively, while the middle three buttons act as preset heights. The second lowest button will fly the shade three quarters of the way in, the middle button will fly it halfway in, and the second from the top button will fly the shade in a quarter of the way down. The first three sets of buttons control the shades for the set of large windows in the Northeast corner, the fourth controls the small window in the Southeast corner, and the fifth controls the window to the 10th floor.
In addition to these shades, there are heavier, velvet curtains which can be pulled out to completely cover the windows in the North end of the space. These are often pushed out of the way and are bunched up near the lighting table in the Northwest corner. Apart from blocking out natural light on a bright day, these curtains are made of a particular material suited for noise isolation and live acoustic optimization. These curtains must be pulled manually and hang from a rail track in the ceiling. Due to the view from the Penthouse, people usually request that the curtains remain pulled back, and thus they very rarely get used. However the shades are useful for an amplified concert in order to mitigate the natural reverb generated from the walls of the space.